BitFire Core Settings

Updated guide for WordPress administrators

A plain-English guide to the BitFire settings that protect your WordPress site.

Cory Marsh
Cory Marsh
Share:
Cory Marsh has over 20 years Internet security experience. He is a lead developer on the BitFire project and regularly releases PHP security and programming videos on BitFire's YouTube channel.

How BitFire protects a WordPress site

BitFire is designed to stop both everyday attacks and newer, harder-to-detect attacks before they can damage your WordPress site. Most WordPress administrators will simply turn on every available protection setting. That is usually the best place to start.

BitFire uses overlapping layers of security so one protection does not have to do everything by itself. Bot controls limit what automated tools can do. The firewall blocks malicious web requests. Security headers harden the browser side of your site. RASP protection monitors what WordPress and PHP are actually trying to do on the server, such as changing files, modifying users, or making risky outbound connections.

This layered design is important because real attacks do not all look the same. Some attackers use automated tools to scan for weaknesses. Others try stolen passwords. Others exploit vulnerable plugins. BitFire is built so that even if one layer does not stop an attack, another layer still can.

Recommended setup for most WordPress sites

  • Turn on every protection setting in General, HTTP, Bots, WAF, and RASP.
  • Leave System settings at their defaults unless BitFire support asks you to change them.
  • Only enable Require SSL after confirming your HTTPS certificate is working correctly.
  • After enabling protection, browse your site normally, log in, submit a form, and test any membership, checkout, or contact features you use.

Why upgrade to BitFire PRO?

BitFire FREE is an excellent first layer for blocking bots and automated abuse. BitFire PRO adds the protections that matter most when the threat is new, targeted, or designed to bypass traditional defenses.

  • Always-On Protection helps BitFire load before WordPress and plugins fully process the request.
  • Daily Malware Scans help detect hidden infections and suspicious changes before they become a bigger incident.
  • RASP protection helps stop dangerous behavior inside WordPress, even when the attack is brand new.
  • Email reporting keeps non-technical site owners informed without needing to read technical logs every day.

FREE vs PRO at a glance

Feature BitFire FREE BitFire PRO
Bot blocking and browser verification Strong protection against bots, scanners, scraping, and automated login abuse Included
Firewall and web attack blocking Blocks common attack patterns and malicious requests Included
Always-On Protection Not included Yes — loads earlier for deeper protection
Daily Malware Scans Not included Yes — helps detect hidden infections and suspicious file changes
RASP / 0-day protection Limited outer-layer protection Yes — monitors dangerous behavior inside WordPress in real time
Best fit Sites that want strong bot blocking and core protection Business-critical sites that need stronger protection from unknown and zero-day attacks

What to expect after you enable BitFire

  • Normal visitors should continue using the site without noticing much change.
  • Some new visitors may briefly see a browser verification screen before they can log in or submit forms.
  • Automated scanners, fake browsers, password-guessing tools, and many spam tools will be blocked or restricted.
  • Your reports and logs may begin showing blocked requests right away. That usually means BitFire is doing its job.
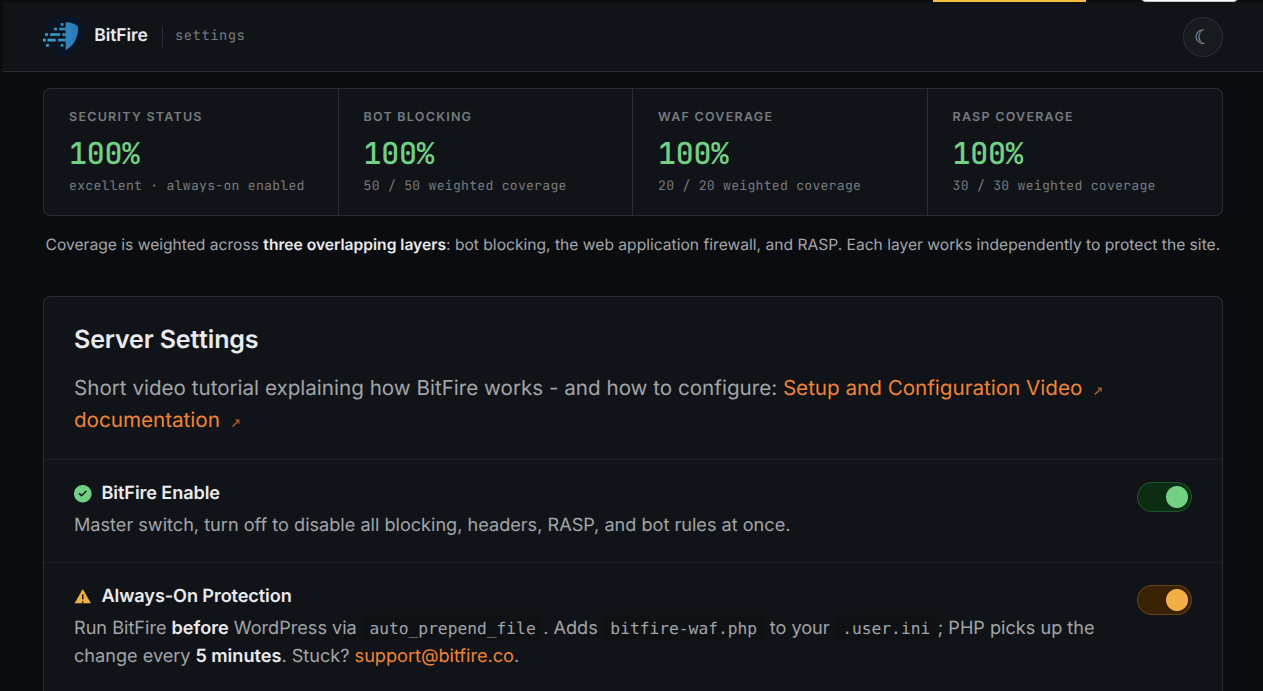
BitFire core settings screen
The BitFire Core Settings screen

General settings

These settings control the main BitFire service, background monitoring, and reporting. For most administrators, this is where BitFire is turned on and where routine alerts are configured.

  • BitFire Enable: This is the main on/off switch for BitFire. If you turn it off, BitFire stops blocking bots, stops sending security headers, stops firewall filtering, and stops RASP protections. If you ever need to troubleshoot quickly, this is the fastest way to temporarily disable BitFire.
  • Always-On Protection: This PRO setting tells the server to load BitFire before the rest of the request is processed. That allows BitFire to protect more than just normal WordPress page loads. It is one of BitFire's most important 0-day protection features because it starts protecting the request earlier, before vulnerable code has as much opportunity to run.
  • Log Site Warnings & Errors: This records PHP warnings and errors from your plugins, themes, and WordPress itself so you can catch problems early. It is helpful for diagnosing plugin conflicts, broken updates, and hidden site issues. Because busy sites can generate a lot of logs, this feature automatically turns itself off after 24 hours to conserve disk space.
  • Automated Malware Scan: This PRO feature performs scheduled daily malware scans to look for suspicious files, hidden backdoors, and signs of compromise. It is one of the few features that can help detect a brand-new infection even when no one yet knows the name of the attack that caused it.
  • Email Reporting: BitFire can email you a summary of important security activity, including malware findings, blocked requests, PHP errors, and other health information. This is one of the easiest ways for a non-technical administrator to keep an eye on site security.

Helpful guidance for General settings

  • If you are new to BitFire, start by making sure BitFire Enable is on and Email Reporting is configured to go to an address you actually check.
  • If your site has had plugin issues in the past, temporarily enabling Log Site Warnings & Errors can quickly reveal hidden PHP problems.
  • Always-On Protection is powerful, but it is more of a hosting-level feature than a normal WordPress setting. If you are unsure, leave it off until you have confirmed it works well on your server.
  • Malware scanning and email reports are especially useful for site owners who do not log in every day.

HTTP security settings

These settings improve how browsers interact with your site. They do not replace the firewall, but they make it harder for attackers to misuse browser features, embed your site somewhere unsafe, or bypass secure connections.

  • Send HTTP Security Headers: Sends a standard group of browser security headers. These help block framing attacks, disable unsafe content sniffing, and reduce unnecessary referral data. For most WordPress sites, this should be enabled.
  • Permission Policy: Restricts browser features that most websites do not need, such as microphone, camera, geolocation, and payment APIs. If malicious code ever runs in a visitor's browser, this setting reduces what that code is allowed to access.
  • Deny Cross-Origin Resource Loading: Prevents other websites from embedding your pages in iframes or making certain cross-origin requests against your site. This reduces the risk of clickjacking and other browser-based abuse.
  • Require SSL (HSTS, 1 year): Tells browsers to always use HTTPS and never fall back to insecure HTTP. This is strongly recommended for sites that are already fully using SSL. Do not enable it until your certificate is working properly, because visitors may be locked out if HTTPS later breaks.

Important caution for Require SSL

Require SSL is one of the best settings for a live WordPress site, but it should be turned on only after HTTPS is working correctly everywhere.

  • Test your homepage, wp-admin, login page, checkout pages, and forms over HTTPS first.
  • Make sure there are no certificate warnings in the browser.
  • If your certificate later expires, visitors may not be able to bypass the warning and continue.

Helpful guidance for HTTP settings

  • If your site is a normal business, blog, or brochure site, these settings should rarely cause trouble.
  • If another service needs to embed your pages or call your site from a browser on a different domain, review Deny Cross-Origin Resource Loading carefully.
  • Permission Policy is mainly a safety feature. Most WordPress sites do not need browser access to a visitor's camera, microphone, or location.

Bot protection settings

Bot protection is one of BitFire's most important defenses. Most attacks against WordPress are automated. They come from scripts, scanners, credential stuffing tools, scraping tools, and fake browsers pretending to be real visitors. BitFire separates real browsers from automated traffic, then limits or blocks the traffic that should not be trusted.

In practice, this means legitimate visitors continue using your site normally while bots are forced into a limited mode or blocked completely. This is what stops many login attacks, scanning attacks, spam attempts, and abuse before they can even reach the rest of WordPress.

  • Require Full Browser: New visitors must pass a lightweight JavaScript browser check before they can submit forms or use restricted parts of the site. Real browsers usually pass automatically. Fake browsers, scripts, and many hacking tools fail this check, which makes this one of the strongest anti-bot settings.
  • Restrict Bot Access (Allow-list): Bots are limited to viewing pages and only the resources you explicitly allow. This helps prevent bots from logging in, submitting forms, calling sensitive APIs, or testing exploit paths. If a legitimate bot needs extra access, you can grant it from the Bot Control page.
  • Block Hacking Tools (Block-list): Instantly blocks requests from known scanning and attack tools such as WPScan, sqlmap, nikto, nmap, and similar software. These tools are rarely used for normal business purposes on a live website, so this setting should usually remain enabled.
  • Block Plugin & Theme Scanners: Interferes with plugin and theme fingerprinting tools by returning misleading or false scanner results. This makes it harder for attackers to identify your exact plugin stack and search for known vulnerabilities.
  • Denial-of-Service Protection: Quickly rate-limits abusive IP addresses that send too many requests in a short time. This reduces server strain and helps keep your site responsive during floods of automated traffic.

How bot protection works in real life

  • A real person opening your site in a normal browser should pass automatically or after a very brief browser check.
  • A script pretending to be Chrome but not behaving like Chrome will usually fail verification.
  • A search engine bot or monitoring bot may be allowed if it can be verified as genuine.
  • An unknown bot is usually restricted to a safer, read-only style of access unless you decide to allow more.

Helpful guidance for Bot Protection

  • If BitFire is blocking a service you trust, check the Bot Control page before disabling bot protection globally.
  • If your visitors report briefly seeing a verification page when logging in, that usually means Require Full Browser is protecting the site as expected.
  • If your site uses a special third-party integration, API client, uptime monitor, or external service, test it after enabling bot restrictions.
  • For many WordPress sites, bot protection prevents more real-world abuse than any other single feature.

Web application firewall (WAF)

The WAF examines incoming requests before WordPress processes them. It looks for attack patterns in URLs, form submissions, cookies, and uploaded files. This is the layer that blocks common web exploits before they can trigger a vulnerable plugin, theme, or custom code.

  • Generic Web Blocking: Blocks broad classes of malicious requests such as path traversal, server-side request forgery, server-side includes, XML entity attacks, and similar exploit patterns.
  • Block XSS: Blocks cross-site scripting attempts that try to inject malicious JavaScript into your site or your visitors' browsers. This protects both administrators and site visitors from a very common category of web attack.
  • Block SQLi: Blocks SQL injection attempts in query strings, form data, and cookies. This helps protect WordPress and plugins from attacks that try to read, modify, or destroy database content.
  • Block Malicious File Uploads: Scans uploaded files before they are written to disk, looking for malicious code, web shells, and other dangerous payloads. This is especially important for sites that accept media uploads, forms with attachments, or plugin-generated file submissions.

Why the WAF matters

WordPress itself is widely used and usually well maintained, but plugins and themes vary in quality. Many attacks are simply malicious requests aimed at known weak points. The WAF blocks many of those requests before the vulnerable code ever has a chance to run.

  • It helps reduce risk from old plugins, abandoned plugins, and coding mistakes in third-party tools.
  • It is especially valuable on sites that accept forms, uploads, or user input from the public.

RASP protection

If your goal is real protection from 0-day attacks, this is the section that matters most. Traditional security tools mostly block known bad requests. BitFire goes further. Always-On Protection, Daily Malware Scans, and RASP are the features designed to protect your site when an attack is brand new, not yet publicly documented, and not yet covered by a normal signature-based rule.

In simple terms, these features protect your site before, during, and after an attempted compromise. Always-On Protection loads BitFire as early as possible. Daily Malware Scans help detect hidden changes and suspicious files. RASP watches what WordPress code is actually doing in real time and blocks dangerous actions even when the incoming request does not look obviously malicious. You do not need to understand how the exploit works to benefit from this protection. BitFire PRO is built to stop the dangerous behavior automatically.

  • File Protection: Stops unauthorized file changes before malware, backdoors, or infected PHP files can be written to your server. This is one of the most important protections against 0-day plugin and theme exploits that try to drop malicious code onto the site.
  • Database Protection: Monitors database activity and blocks unauthorized account changes, privilege escalation, and suspicious write operations in real time. This helps prevent attackers from quietly creating hidden administrator accounts or modifying core site data after gaining access.
  • Network Protection: Blocks outbound connections to known malicious command-and-control systems. If compromised code tries to call home, download more malware, or connect to attacker infrastructure, BitFire can stop it.
  • Login & Account Protection: Verifies that sensitive administrator actions are backed by real authentication. This helps block authentication-bypass exploits, which are a common way attackers abuse new WordPress vulnerabilities.

Why this is BitFire's true 0-day protection layer

  • Always-On Protection helps BitFire load before normal WordPress processing, so protection begins as early as possible.
  • Daily Malware Scans help you catch new infections, hidden files, and suspicious changes before they become a bigger problem.
  • RASP does not rely only on recognizing a known attack pattern. It watches for dangerous behavior itself.
  • That means BitFire can stop actions like writing a PHP backdoor, creating a rogue admin user, or making a malicious outbound connection even if the exploit is completely new.

Why operators should enable every available protection here

Most site owners will never know the name of the attack that was used against them, and they should not have to. What matters is whether the attack can alter files, change users, abuse the database, or connect your server to attacker infrastructure.

That is why this layer is so important. When a brand-new exploit appears, Always-On Protection, Daily Malware Scans, and RASP are the features that provide the strongest real-world protection for your WordPress site.

Helpful guidance for Login & Account Protection

This protection is strongly recommended. If you use a plugin or service with an unusual login flow, test it after enabling this setting, but for most WordPress sites it should remain on because it helps stop attackers from turning a new vulnerability into administrator access.

System settings

These are advanced configuration options. Most WordPress administrators should leave them alone unless BitFire support or your hosting provider tells you otherwise. They control how BitFire stores temporary data, identifies visitors, and logs internal information.

  • Cache Type: Chooses the server-side cache method BitFire uses for internal data such as IP information and counters. When available, SHMOP is preferred. The JSON option is a fallback file-based cache.
  • Concurrency Lock Backend: Controls how BitFire safely handles multiple requests trying to update the same data at once. This is usually auto-detected during setup and should only be changed for special hosting or clustered file-system setups.
  • DNS Service: Selects the recursive DNS server used for bot verification lookups. This affects how BitFire confirms whether a bot is genuine.
  • Block HTTP Response Code: Sets the HTTP status code sent to blocked visitors. In most cases, 401 or 403 is appropriate.
  • Remote IP Source: Tells BitFire where to find the real client IP address. This is important if your site uses Cloudflare, a reverse proxy, or a CDN. If this is set incorrectly, visitors may be identified by the wrong IP address.
  • Browser-Check Response Code: Sets the status code returned with the browser verification page. Using 401 or 428 can help prevent proxies from caching the challenge page.
  • Report BitFire Errors: Logs BitFire's own internal PHP errors and can forward them to the BitFire developers. Leave this enabled if you want problems reported and diagnosed more easily.
  • Enable BitFire Debug Log: Temporarily writes detailed BitFire debugging information to its debug log. This is mainly used for troubleshooting with support and normally does not need to stay on.
  • Clear Cache: Deletes BitFire caches, counters, and saved IP state. This can be useful after major configuration changes or during troubleshooting, but it is not something most administrators need to do regularly.

Helpful guidance for System settings

  • If you do not know what a setting means here, the safest choice is usually to leave it at the default.
  • Remote IP Source is the most important advanced option for many websites behind Cloudflare or another CDN. If it is wrong, BitFire may see the proxy IP instead of the visitor IP.
  • Enable BitFire Debug Log is best used only when support asks for it, because it is intended for troubleshooting.
  • Clear Cache can be a helpful first step if you changed a network, proxy, or bot setting and want BitFire to rebuild its saved state.

How the layers work together

BitFire is strongest when its features are used together. Bot protection keeps fake browsers and automated tools away from sensitive areas. The WAF blocks malicious requests that try to exploit known attack patterns. HTTP security settings make browser-side abuse harder. RASP watches for dangerous behavior inside WordPress in case an attacker slips past the outer layers. Reporting and logging make sure the site owner can still see what is happening.

For most WordPress administrators, the safest approach is simple: enable the available protections, leave the advanced system settings alone, and review your security reports regularly.

A simple way to think about BitFire

  • Bot Protection decides who should be trusted to interact with the site.
  • WAF inspects what they are sending.
  • HTTP Security hardens how the browser handles your site.
  • RASP watches what the application actually does on the server.
  • Reports and logs help you understand what was blocked and whether anything needs attention.

Troubleshooting and common questions

If a real visitor cannot log in or submit a form

  • First, test the page yourself in a normal browser.
  • Check whether the visitor is failing the browser verification step.
  • Review the Bot Control page to see whether the traffic is being classified as a bot.
  • If a specific trusted service needs access, adjust the bot rules for that service rather than disabling BitFire completely.

If a plugin or theme feature stops working

  • Temporarily check the logs and error reporting options to see whether the issue is a PHP problem rather than a security block.
  • Test whether the feature depends on cross-origin browser requests, a special login method, or automated service access.
  • The most likely settings to review are bot restrictions, cross-origin protections, and Login & Account Protection.

If your site is behind Cloudflare or another CDN

  • Make sure Remote IP Source is configured correctly.
  • If the wrong IP source is selected, many visitors can appear to come from the same IP, which may affect bot detection and rate limiting.

If you are not sure whether BitFire is working

  • Look for blocked or challenged requests in BitFire reporting.
  • Check whether obvious scanning traffic, login abuse, or repeated bot requests are being detected.
  • Remember that good security is often quiet. If your normal visitors are unaffected while bad traffic is being blocked, the system is working as intended.

A good rollout order for cautious administrators

  1. Enable BitFire.
  2. Enable bot protection, WAF, and RASP.
  3. Test wp-admin, logins, forms, uploads, and any checkout or membership features.
  4. Enable HTTP security settings.
  5. Enable Require SSL last, after confirming HTTPS is fully working.

When FREE is enough, and when PRO is the better choice

If you run a personal site, brochure site, or small blog, BitFire FREE may already provide meaningful protection against bots and common attacks. But if your site supports your business, stores customer data, runs WooCommerce, depends on leads, or simply cannot afford downtime, BitFire PRO is the safer choice.

Most WordPress administrators do not want to learn the difference between a browser fingerprinting check, a malware scanner, and runtime protection. They should not have to. What matters is that your site is protected before an attacker can change files, create a hidden administrator account, or inject malware.

Most site owners do not discover they needed 0-day protection until after the damage is already done. BitFire PRO is built for that moment: to help stop modern attacks before they become a cleanup project, a customer trust issue, or a lost-revenue event.

Cory Marsh
Cory Marsh
Share:
Cory Marsh has over 20 years Internet security experience. He is a lead developer on the BitFire project and regularly releases PHP security and programming videos on BitFire's YouTube channel.